Tuesday 24 September 2013

How to get art in your game without being a professional

I'm not an artist, but I need art in my game.

This is part 3 in a series of articles describing how I approached each aspect of creating Immortal Empire as an independent developer. Read the whole backstory here.

Artwork is the area I relied most heavily on outsourcing to a number of individuals, most notably Mat Chambers (characters), David Baumgart (spell icons, fx), Zenobia Homan (tiles, environment objects), and Eric Vedder (illustrated characters). A few other artists (Sergei Churbanov, Cecilia Santos, Jasmin McGahan, David Scott) helped out as well to which I am eternally grateful.

Of course, trying to coordinate so many different people was difficult, and in some cases I needed to fill in some gaps with artwork myself.  In my previous article where I discussed the music to Immortal Empire, I pointed out that I have some formal experience with music, making that aspect of the game much easier to tackle.  When it comes to artwork however, I have literally no experience to draw upon. (moar puns!!1)

In the end, I deigned to create some affectionately termed coder art, much of which can be seen in the final product.  This article describes the process I went through and includes some tips I picked up which are hopefully useful to other artistically barren programmers like myself who need art in their indie games.

I'm very proud of many things in Immortal Empire, but let's face it, the artwork is not exactly cutting edge. At a fixed 800x600 resolution and consisting almost entirely of hand-drawn 2D pixel art, Immortal Empire's artwork lands somewhere between X-Com and Warcraft II, meaning it would feel right at home if it were released in 1995.  Alas, it was released in 2013.

Click for full-size
Many games have managed to be very successful in recent years despite not having advanced graphics, often employing a minimalist style to great effect.  Unfortunately I feel as though minimalism just wouldn't have worked for the game design of Immortal Empire, so instead I attempted to mimic a style that is very nostalgic for me: early 90s PC games.

Onto the artwork. I contributed in a number of areas, but I'm going to focus on a couple images I drew that will best describe the process.  Here is the animation for the entangle spell on the left, and the idle pose for the Elder character on the right.


For the pixel art, the process I eventually settled on went something like this.

0. Compare against a couple different neutral colour backgrounds, never change your opacity, and always work on a separate layer.  Accidentally using alpha or manually blending into a fixed colour background looks terrible in game, and it is a very easy mistake to make. Using separate layers for each step lets you restart when you make mistakes and do A/B comparisons easily.


1. Start with an outline.  When drawing lines (without alpha transparency), I found it almost always looked better to leave diagonals open rather than filled in like the image on the right. 
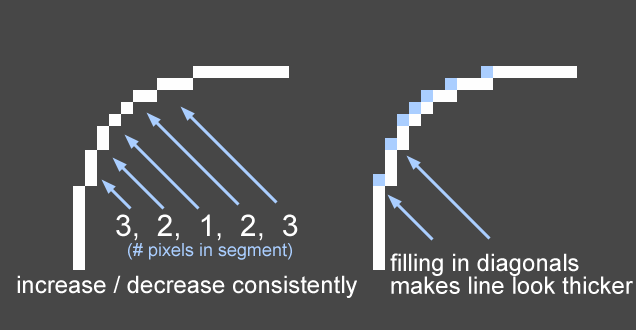

When creating rounded lines, decrease or increase the number of straight-line pixels consistently, rather than doing something arbitrarily. I'll often draw the line free-hand at first, delete the diagonals, then touch up the curve to keep line lengths consistent.


This might sound obvious but you really don't want to move onto the next step until you have finished this one.  At this stage, a silhouette can work as well, but I prefer an outline so you don't lose interior details.

2. Add shading to your outline. As with the lines widths, be consistent in how you gradient the colour.  By that I mean gradually increase or decrease the luminosity rather than flipping back and forth or skipping a shade.  I try to avoid adding detail in this step, instead I just shade uniformly. When creating rounded things like the tentacles below, I found it often looked best to put the brightest section near the center, not right on the edge. Keep a palette of distinct colours you have used on a separate layer for future use.


3. Add detail to the shading. This is where you can put creases in clothing, make things appear rough or shiny, or add dithering if that is your art style.   I try to avoid introducing new colours here, and instead would refer to the palette that I created in step #2.

Click for full-size
4. Add final touches.  Here I add little doodads like the buckle on the Elder's sash or the thorns on the tentacles. When doing this step, I found I often had to go back and adjust the shading.  For example, creating a little shadow underneath the buckle made it feel less flat.  Only when I am 100% happy with the look of this one frame will I start another frame of animation or attempt to draw more of the same element (such as the multiple tentacles in the entangle spell).

That's it!  My preferred setup is to use two windows, one zoomed in very close where I edit the pixels, and another zoomed out to 100% so I can actually look at the results. I check the actual zoom distance frequently, as I found that things sometimes look great zoomed in, but from afar look totally wrong. In fact, the opposite can also be true!

Like most things, art of course takes years of practice to improve. But here's hoping these few tips can help other artistically challenged independent developers like myself create some medicore but passable artwork for their games.  If you have anything to add about your adventures in this regard, or tips you can suggest, please comment below!

Thursday 8 August 2013

How to get music in your game without being a professional

I'm not a music composer, but I need music in my game.

This is part 2 in a series of articles describing how I approached each aspect of creating Immortal Empire as an independent developer. You can read the whole backstory here.

One of my favourite things about gaming, in particular when playing RPGs, is enjoying the musical score.  From Jeroen Tel, to Nobuo Uematsu, to Jeremy Soule, there are so many talented composers out there, and I just love listening to game music both in game and out.

So when I started working on Immortal Empire, I knew I wanted it to have a full orchestral score.  Somewhat surprisingly, I don't have an orchestra in my basement, so all the tracks had to be created digitally.  I wrote five of the twenty tracks in the game, the remainder came from a mix of outsourcing to Symphony of Specters (they worked on Castle Crashers, among other things), and a group of composers from the exceptionally talented Renoise community.  The Renoise composers contributed their songs effectively for free (I hosted a small competition with a few prizes), and I was blown away with the quality, community spirit, and overall generosity of this group.

Now while I'm not a professional, I should point out that I do have a background in music, which does make things much easier for me in this area.  I've had formal training in piano and classical guitar, and have been composing MOD music for years as an extremely remote, essentially non-existent member of the demoscene.  So naturally I write music in the excellent, tracker-style program, Renoise.

This article will be discussing how I approached writing music for the game, which you can learn about more in the following video! 


Obviously there's no right or wrong way to create a song, and truthfully the method I use changes depending on the style I'm working on.  But, this is the approach I took for this particular song, so maybe you will find it helpful.  To summarize the video, the steps I took are:
  1. Establish the mood of what you're trying to create.  Have that in the forefront of your mind throughout all the next steps. Ask yourself, does this fit?
  2. Create the rudimentary elements of the song. For the song in the video, I created a motif (in the video I call it the "theme") and a melody.  I generally just use octaves in the left hand and single notes in the right hand to keep things simple at this stage.
  3. Add more complex musical elements, starting in the middle of the whole song.  Put together a single bar that has all the components and instruments you want.  If the bar never sounds right, go back a step and work on the basics again. Once that bar sounds correct, now write the beginning of the song and work up to that bar.  Then create variations on your original concept to finish off the song.
  4. Finishing touches. Listen to the song front to back a few times.  Vary the percussion, fill in gaps that sound empty, and pull back areas that are too cluttered. If you've listened to it 10 times over the course of a few days and it still sounds pretty good, then you might just be done!
I'd also like to briefly touch on another important element of finishing up your song which is audio mastering.  The basic premise is just to take the music you have already written and make it sound better.  Again I am no professional here, but I can give you a few rookie tips to make your song sound more put together.
  1. Panning. This is using stereo to make your song sound more full. Put some headphones on and start placing some instruments a little to the left and others a little to the right. Imagine an orchestra in your head. They're all in front of you for the most part, but the group of violins might be sitting off to one side, the cellos on the other. Emulate this in your song. Adjusting panning can sometimes disturb the instrument volumes you have carefully set, so you might want to keep an eye on them during this process.
  2. Equalization. This is adjusting the low, mid, or high frequencies to fine-tune the tone of your song.  Depending on how much control you have over the samples, you might not need a lot of equalization. As a general rule, I try to use equalization to remove noisy and cluttered frequencies rather than boost areas that sound too thin.  If it still doesn't sound right after this step, I might go back and change out the instrument used.
  3. Compression. This is taking the quiet parts of your song and making them louder, reducing the overall dynamic range of your song to make it sound loud.  My rule of thumb here is to not compress very much.  The reason being that you still want loud parts to sound big relative to the quiet parts.  I usually compress if I find myself wanting to adjust the volume while I'm listening to the song.
  4. Limiting. This is preventing the occasional extra-loud bits in your song from causing distortion by clipping the amplitude peaks.  A limiter will also let you maximize the volume of your song by boosting the input before the clipping occurs.  My rule here is to try and minimize the amount of clipping. You only want a few anomalous blips and blops to be clipped, not a whole loud section.
So that's my process! Writing music is by no means easy and there are a lot of professionals out there who can produce simply amazing results.  But when you're on a budget and can manage with something simple, hopefully the above tips will help you out.

If you want to listen to the soundtrack, you can hear it all for free or download a full quality digital copy for only $7 at http://tacticstudios.bandcamp.com.  Since Immortal Empire is browser-based, the in-game music was significantly reduced in quality to keep the download size small. The soundtrack of course is mastered at full CD quality, and boy does it make a difference! 

Whether you're a professional composer or an amateur, I'd love to hear any stories you might have with writing music, so feel free to comment below!

Friday 7 June 2013

How to get sound effects in your indie game without being a professional.

I'm not a sound designer, but I need sound in my game.

This is part 1 in a series of articles describing how I approached each aspect of creating Immortal Empire as an independent developer. You can read the whole backstory here.

When it came down to adding sound effects to the game, I started down what seemed like the most logical path for someone who is not a sound designer.

"I have the power of the internet. Everything is on the internet! I'll just snoop around and download royalty-free sounds," I thought. Sure enough after hours of searching, I found very few useful sounds even in paid catalogs.  The style and timbre of the sounds were inconsistent, sometimes too long, sometimes too short, sometimes just not the right type of effect at all, and it took forever to sort through miscellaneous bits of audio.

So what now? The internet has failed me. Well, I did what I must. Time to try making the sounds myself! I borrowed a Zoom H4N hand recorder from a friend, and was introduced to the fascinating world of foley art. Put simply, it is recording yourself banging stuff around until it sounds like you want.

It sounds (hoho - pun) like it would be more work, but for me, this was actually much easier and a lot more fun. I was astonished at how simple objects just lying around my house could be used to create the sound of equipping weapons, or throwing a dagger. Recording the audio myself, I had full control over everything. I could do as many takes as I wanted, get the right tone, length, volume, and keep the audio style consistent.  It actually worked out really well.

Of course, I filmed some of my adventures.


If you watched that video, I know what you're thinking. "You use Cool Edit Pro from the year 2000?" Why yes, yes I do.  If you didn't watch it, to summarize the video, here's a few things I found very useful when recording my own audio.
  1. Keep trying stuff.  Sometimes what you pick up at first might not work. But, you'd be surprised how easy it is to just grab 20 objects, try them all, and find a great, useful sound you weren't even expecting. I picked up a stainless steel pot for armor sounds, but found it could very easily make sword sounds as well.
  2. Do lots of takes. Hit the objects differently. Holding longer, scraping sideways, hitting harder, rattling it a bit, things like that. I did about 15-20 takes per type of sound. It's simple to just listen to them and pick the ones that turned out best.
  3. Combine sounds. The bow equip sound is me dropping a wooden dowel, while plucking an elastic band, and ending with a thump from a wooden block. Blending sounds together, including directly overlapping them, is a great way to get a different overall sound. I can't tell you how often I blended in the sound of me punching a phone book into other sounds to give them more "oomph"
A note on the audio for spells. Some of the more physical-based spells were recorded using the above process, but the more magical ones often required tones I wasn't able to produce with household objects. In these cases, I called upon a gigantic library of samples I have been collecting over the last 20 years for the purposes of writing MODs (and their various successors). That includes a mixture of ripped stuff, some downloaded samples, and sounds I recorded from various synths I've been fortunate enough to use over the years (A Roland Juno-2, Yamaha PSR-300, PSR-730, and CS6X)

I mention in the video that I didn't create all the sounds myself, and that's true! So I want to give credit where it's due. My friend George Spanos is a professional sound designer and author at gamesounddesign.com. He's who I borrowed the hand recorder from (I have since bought my own) and he also contributed a lot of fantastic audio for the project, in particular for a bunch of the monsters.  So while this article is about doing things on your own, which is often necessary for an indie, it is of course incredibly helpful to have a few friends that can assist you with your project. Thanks George!

Hope you enjoyed the article! Myself and any readers I'm sure would love to hear your experiences with sound design, so go ahead an comment below!

To try out Immortal Empire, visit the website, or play on Kongregate.


Thursday 6 June 2013

I'm not a sound designer, but I need sound in my game

This is a recurring problem I encountered when developing Immortal Empire, a strategic role-playing game by my company Tactic Studios.  It required a lot of content to develop this game, and with few resources at my disposal, much of it had to be created by myself. The problem being of course, when it comes to certain fields like sound or art, I'm no professional. So I had to figure out something that would work.

This is no doubt a common situation among independent developers like myself, so I'm writing a series of articles sharing how I approached each facet of game development for Immortal Empire, and ended up with a finished game. Hopefully this will be useful for other indies who, like me, couldn't rely on professionals for everything.  The topics I will be covering are:
  • Sound Effects
  • Music
  • Art
  • Design
  • Code
  • Quality Assurance
  • Business Development
It might be useful to know a bit of information about myself and the game I developed. Immortal Empire is a throwback to mid 90s PC games when 320x200 resolution and 256 colours was the gold standard. Inspired by games like X-Com, Diablo, and Dota, it is a multiplayer, strategy-based role-playing game.  All the in-game artwork is hand drawn 2d pixel art, displayed in an isometric view.  It has a fully digital original soundtrack, co-op, single player, versus mode, the whole bit.  Everything is crammed into a web-browser and it is playable across Windows, Mac, and Linux.

My primary background and education is in programming, having worked professionally as a programmer in video game development for the past 8 years on larger games and franchises such as BioShock.  In my spare time I wanted to develop games on a smaller scale, to keep up my coding chops and because it was fun to create the types of games I played when growing up. 

This series of articles is meant to shed some light on my experience with this process, with the aim being that hopefully other developers in the same situation can benefit from the lessons I learned and apply them to their own projects.  If you have any stories to share, professional or amateur, about your experiences with the topics I'm covering, please comment! I'm sure myself and other readers would love to hear your perspective. 

Now onto the articles...